Publish XR Content
The publishing XR content page allows creators to share their AR, VR, and MR experiences with audiences worldwide. Creators can upload their XR content, set visibility preferences, and publish it for others to explore on the VueXR platform.
Upload Content
VueXR offers a streamlined process for uploading XR experiences, empowering creators to share their immersive content with the world. The platform supports two primary methods: VueXR Rig and VueXR Website forms.
VueXR Rig serves as a powerful Unity-based toolset for content creation and uploading. Creators can leverage its features to directly upload XR content from within the Unity environment. Upon selecting the "Upload Vue from Unity" option, they gain access to the "Add new Vue" functionality. This prompts the display of a comprehensive form, allowing creators to meticulously define their Vue's attributes.
The form encompasses crucial details such as Vue type, title, and description, enabling creators to provide concise and engaging information. To enhance visual appeal, creators can select a captivating banner image that accurately represents their Vue. By adhering to a 16:9 aspect ratio and a minimum resolution of 720x405, creators can ensure optimal presentation.
VueXR Rig further empowers creators with the ability to customize environmental elements. Creators can effortlessly incorporate a custom skybox or alter the background color and display mode to align with their artistic vision. Moreover, fine-tuning the ambient light settings and toggling interactivity options allows creators to enhance the overall immersive experience.
Upon completing the form, creators can seamlessly upload their Vue to the VueXR platform, making it accessible to a global audience. A pop-up window provides a convenient "View" button, redirecting creators to the VueXR website. By logging in using their credentials, creators can verify the successful upload and review their Vue's appearance and functionality.
In addition to VueXR Rig, VueXR also provides the VueXR Website forms, offering an alternative approach to uploading XR experiences. This method caters to creators who prefer a web-based workflow. By logging in to the VueXR website, creators can access the intuitive forms designed to capture essential Vue details.
Within the website forms, creators meticulously define their Vue's title, description, and category, ensuring accurate classification and discoverability. The selection of an impactful banner image plays a vital role in captivating the attention of potential users. Creators can effortlessly upload their Vue files, generated within Unity, for various platforms, ensuring compatibility and optimal performance.
The VueXR Website forms provide creators with ample options to tailor the Vue's display and user experience. From selecting the appropriate display mode to defining the background color, creators can curate a visually stunning and immersive XR environment. Furthermore, creators have the flexibility to choose Vue's location, either globally accessible or within a specific GPS range, thereby catering to diverse audience preferences.
With both VueXR Rig and VueXR Website forms, creators are equipped with robust tools to upload XR experiences, empowering them to share their immersive creations effortlessly. By leveraging these intuitive workflows, creators can contribute to the ever-expanding library of XR content on the VueXR platform, driving innovation and captivating audiences worldwide.
VueXR Rig
Here's a step-by-step guide to uploading XR experiences using VueXR Rig:
-
Launch Unity: Open the Unity development environment on your computer.
-
Install VueXR Package: If you haven't already, install the VueXR package into your Unity project. This package provides the necessary tools and functionality for XR content creation.
-
Create XR Experience: Develop your XR experience within Unity using the VueXR Rig tools. Design and implement interactive elements, 3D models, animations, audio, and any other components that make up your XR experience.
-
Test the XR Experience: Before uploading, thoroughly test your XR experience within Unity to ensure it functions as intended. Verify that all interactions, animations, and visuals are working correctly.
-
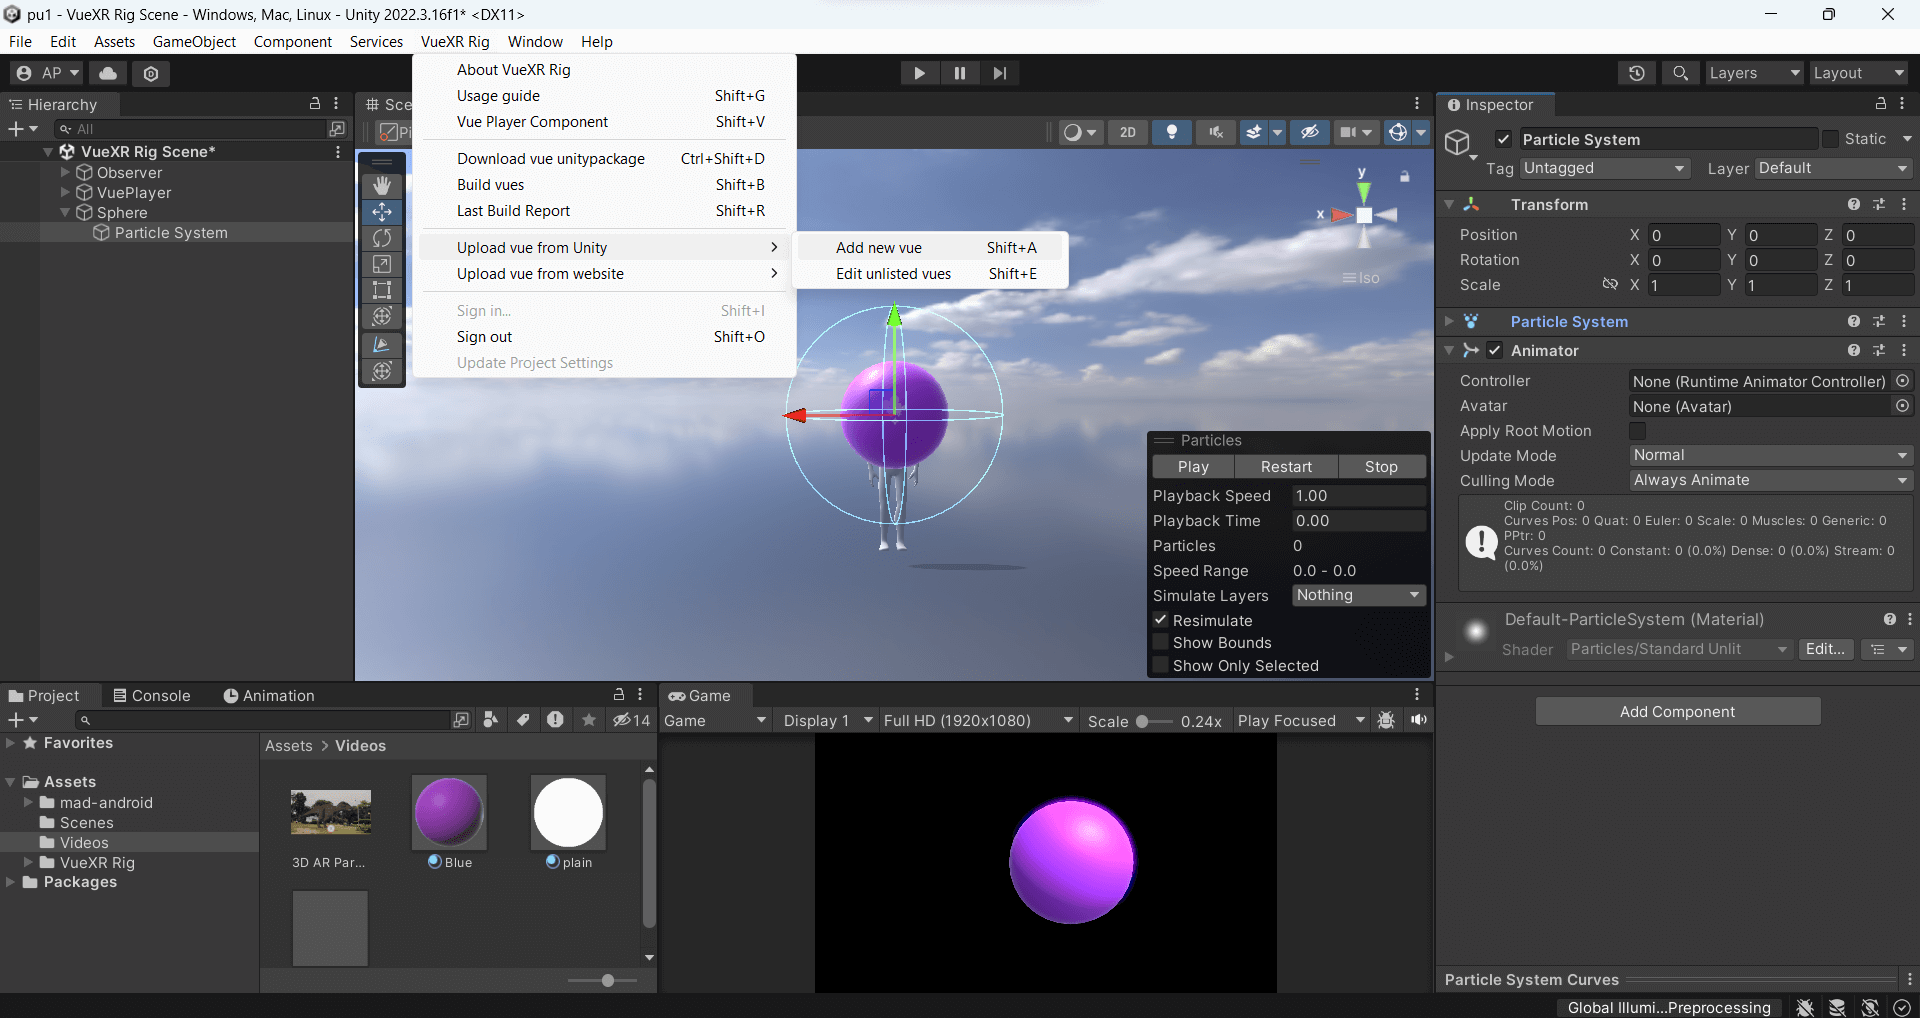
Open VueXR Rig: In the Unity toolbar, navigate to the VueXR Rig menu and open the VueXR Rig window.
-
Sign in to VueXR: Within the VueXR Rig window, click on the "Sign In" button and enter your VueXR account credentials. If you don't have an account, create one by following the provided instructions.
-
Upload Vue from Unity: Click on the "Upload Vue from Unity" button in the VueXR Rig window. This initiates the process of uploading your XR experience to the VueXR platform.
-
Add New Vue: After selecting "Upload Vue from Unity," click on the "Add new Vue" button. A form will appear where you can provide details about your XR experience.
-
Fill the Vue Details: In the form, enter the Vue title, and description, and select the appropriate Vue type. Choose a visually appealing banner image that represents your XR experience effectively. Customize additional settings such as skybox, background color, ambient light, and interactivity options based on your preferences.
-
Upload the Vue: Once you've filled in the Vue details and customized the settings, click on the "Upload" button. The VueXR Rig will package your XR experience and initiate the upload process to the VueXR platform.
-
Verify and Preview: After the upload is complete, a pop-up window will appear. Click on the "View" button to be redirected to the VueXR website. Sign in to your VueXR account if prompted. Here, you can verify that your XR experience has been successfully uploaded and preview it within the VueXR website.
-
Publish the Vue: If you are satisfied with the preview, you can proceed to publish your XR experience by following the necessary steps on the VueXR website. This will make your XR experience accessible to users on the VueXR platform.
By following these steps, you can effectively upload your XR experiences using VueXR Rig, showcasing your immersive creations to a wide audience, and contributing to the XR content library.
Website
A step-by-step guide to uploading VXR files using the website.

Here's a step-by-step guide to uploading XR experiences using the VueXR website:
-
Visit the VueXR Website: Open your preferred web browser and navigate to the VueXR website.
-
Sign In If you already have a VueXR account, click on the "Sign In" button in the top right corner of the website. Enter your account credentials to log in. If you don't have an account, click on "Sign Up" to create a new account.
-
Click on the upload icon: Click on the upload icon located next to the profile picture in the top right corner of the screen. This initiates the process of uploading your XR experience to the VueXR platform.
-
VXR tab: Select the VXR tab in the Vue upload form.
-
Upload Vue Files: In the upload form, you will find options to upload the required.VXR files. Go to the asset folder in your Unity project locate the My Vues folder and upload it. Follow the instructions provided to select and upload the correct files. (My Vues folder is created once the build process is complete.)
-
Fill Vue Details: In the VueXR upload form, provide the necessary details about your XR experience. This includes entering the Vue title, and description, selecting the appropriate Vue type, and choosing a visually appealing banner image that represents your XR experience effectively.
-
Customize Vue Settings: Customize additional settings based on your preferences. This may include selecting the display mode, and background color, and specifying the location where you want your XR experience to be shown (anywhere or at a specific GPS location).
-
Verify and Preview: Once all the required files are uploaded, review the details and settings you have provided. If everything looks good, click on the "Save" or "Upload" button to proceed. You will be redirected to a preview page where you can verify that your XR experience has been successfully uploaded and preview it within the VueXR website.
-
Publish the Vue: If you are satisfied with the preview and want to make your XR experience accessible to users, click on the "Publish" button. This will publish your XR experience on the VueXR platform, making it available for others to discover and interact with.
By following these steps, you can easily upload your XR experiences using the VueXR website, expanding your reach and sharing your immersive creations with a wider audience.
A step-by-step guide to uploading GLB files using the website.
Here is a step-by-step guide to uploading .glb files using the VueXR website:
-
Visit the VueXR Website: Open your preferred web browser and navigate to the VueXR website.
-
Sign In If you already have a VueXR account, click on the "Sign In" button in the top right corner of the website. Enter your account credentials to log in. If you don't have an account, click on "Sign Up" to create a new account.
-
Click on the upload icon: Click on the upload icon located next to the profile picture in the top right corner of the screen. This initiates the process of uploading your XR experience to the VueXR platform.
-
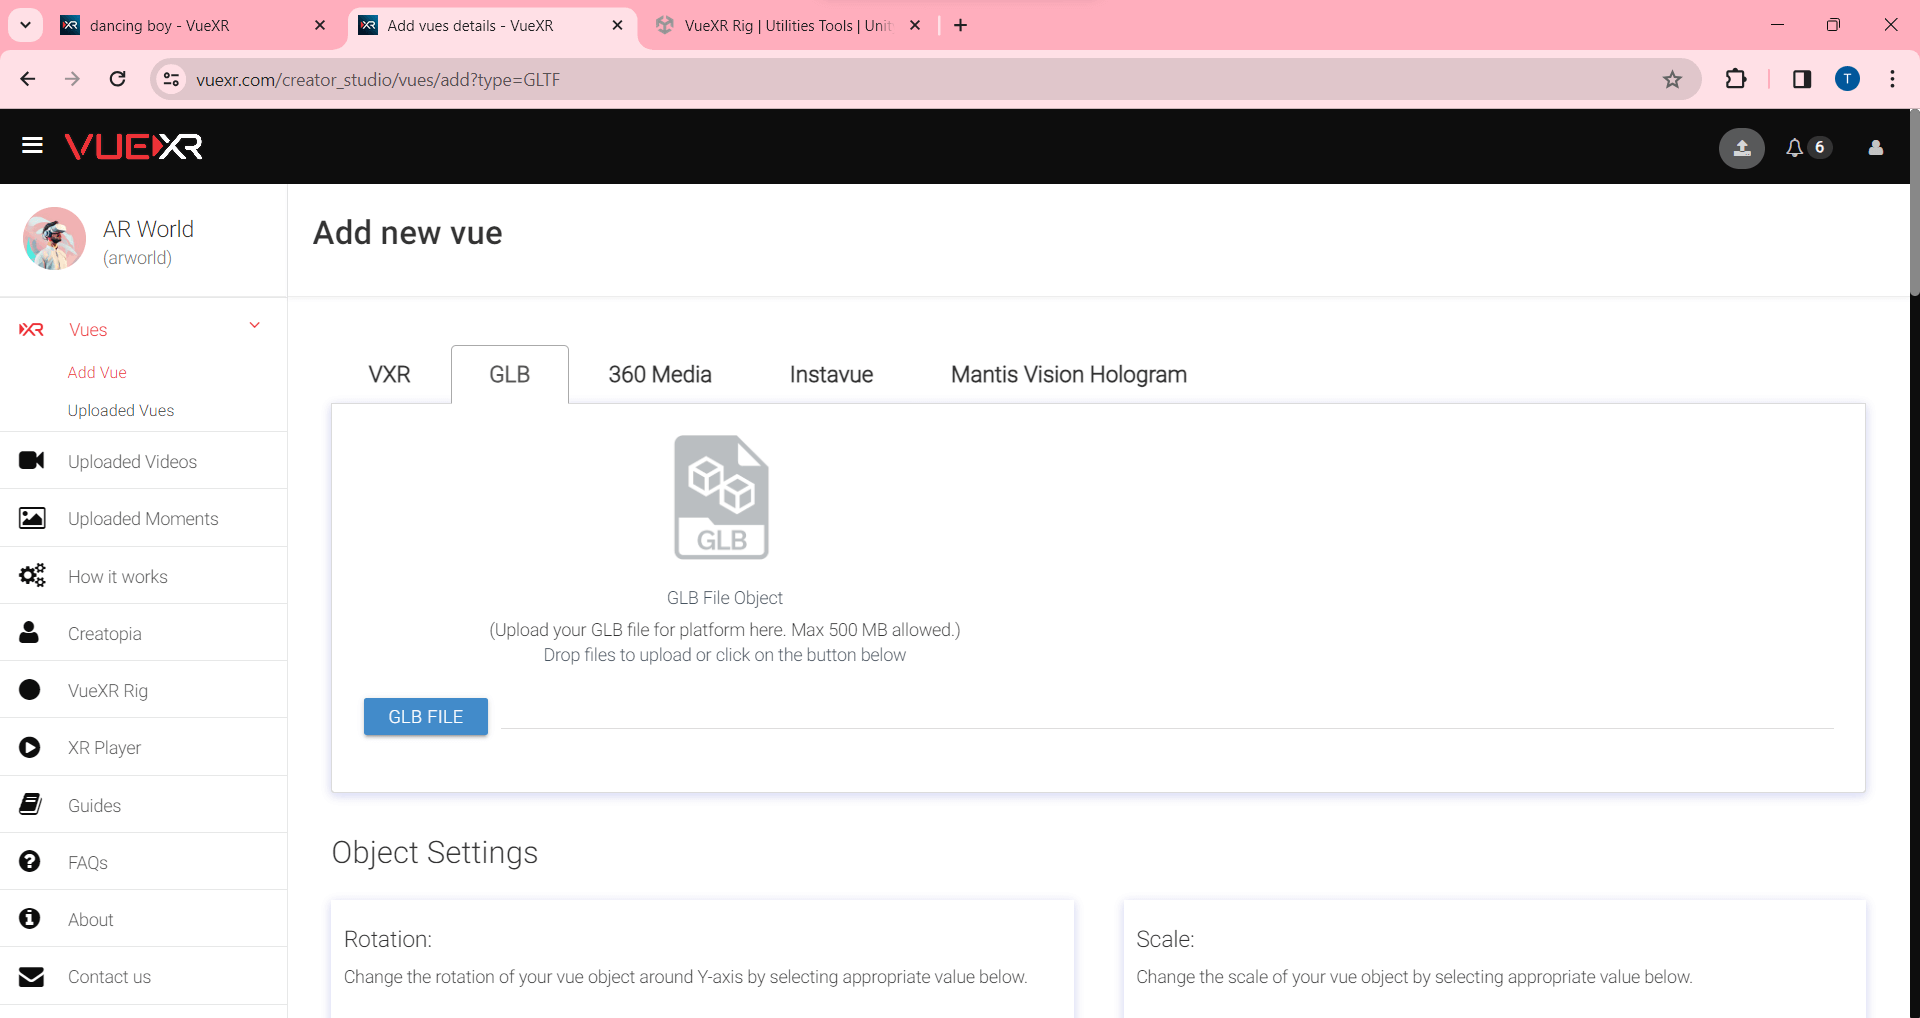
GLB tab: Select the GLB tab in the Vue upload form.
-
Upload GLB Files: In the upload form, you will find the option to upload the required .glb file.
-
Choose the .glb file: On the upload page, click on the "Select File" button to browse your computer's files and select the .glb file you want to upload. Ensure that your .glb file meets the requirements specified by VueXR (e.g., file size, supported formats).
-
Enter details and settings: After selecting the .glb file, you will be prompted to enter additional details and settings for your XR experience. This may include the title, description, category, and other relevant information. Fill out the form with the required information.
-
Customize the XR experience: Depending on the platform and features supported by VueXR, you may have options to customize the XR experience. This can include selecting a background, adjusting lighting settings, enabling interactivity, or setting up other specific parameters. Customize these options according to your preferences.
-
Confirm and upload: Once you have filled out the necessary details and customized the XR experience settings, review all the information you have entered. Ensure that everything is accurate and to your satisfaction. When ready, click on the "Upload" button to start the upload process.
-
Wait for the upload to complete: The website will initiate the upload process for your .glb file. This may take some time, depending on the file size and your internet connection speed. Be patient and wait for the upload to complete. Do not navigate away from the page or close the browser during this process.
-
Preview and test the XR experience: After the upload is complete, you will typically have the option to preview and test your XR experience. Use the provided tools or functionality on the VueXR website to view and interact with your uploaded content. Ensure that everything looks and functions as intended.
-
Save and publish: If you are satisfied with the preview and testing results, save your XR experience and proceed to publish it. Follow the on-screen instructions or prompts to finalize the publishing process.
-
Share and distribute: Once your XR experience is published, you can share it with others by providing the relevant links or sharing options provided by VueXR. Promote and distribute your XR experience to reach your intended audience.
By following these steps, you can successfully upload .glb files and create XR experiences using the VueXR website. Remember to double-check all the details and settings before publishing to ensure the best possible experience for your audience.
A step-by-step guide to uploading 360 Media using the website.

Here is a step-by-step guide to uploading 360 Media files using the VueXR website:
-
Visit the VueXR Website: Open your preferred web browser and navigate to the VueXR website.
-
Sign In If you already have a VueXR account, click on the "Sign In" button in the top right corner of the website. Enter your account credentials to log in. If you don't have an account, click on "Sign Up" to create a new account.
-
Click on the upload icon: Click on the upload icon located next to the profile picture in the top right corner of the screen. This initiates the process of uploading your XR experience to the VueXR platform.
-
360 Media tab: Select the 360 Media tab in the Vue upload form.
-
Upload 360 image or 360 video Files: In the upload form, you will find the option to upload the required 360 image or video file.
-
Choose the file: On the upload page, click on the "Select File" button to browse your computer's files and select the 360 media file you want to upload. Ensure that your file meets the requirements specified by VueXR (e.g., file size, supported formats).
-
Enter details and settings: After selecting the 360 media file, you will be prompted to enter additional details and settings for your XR experience. This may include the title, description, category, and other relevant information. Fill out the form with the required information.
-
Confirm and upload: Once you have filled out the necessary details, review all the information you have entered. Ensure that everything is accurate and to your satisfaction. When ready, click on the "Upload" button to start the upload process.
-
Wait for the upload to complete: The website will initiate the upload process for your 360 media file. This may take some time, depending on the file size and your internet connection speed. Be patient and wait for the upload to complete. Do not navigate away from the page or close the browser during this process.
-
Preview and test: After the upload is complete, you will typically have the option to preview and test your 360 media. Use the provided tools or functionality on the VueXR website to view and interact with your uploaded content. Ensure that everything looks and functions as intended.
-
Save and publish: If you are satisfied with the preview and testing results, save your Vue and proceed to publish it. Follow the on-screen instructions or prompts to finalize the publishing process.
-
Share and distribute: Once your XR experience is published, you can share it with others by providing the relevant links or sharing options provided by VueXR. Promote and distribute your XR experience to reach your intended audience.
By following these steps, you can successfully upload 360 media files and create XR experiences using the VueXR website. Remember to double-check all the details and settings before publishing to ensure the best possible experience for your audience.
A step-by-step guide to uploading Instavue using the website.
Here is a step-by-step guide to uploading Instavue 2d media files using the VueXR website:
-
Visit the VueXR Website: Open your preferred web browser and navigate to the VueXR website.
-
Sign In If you already have a VueXR account, click on the "Sign In" button in the top right corner of the website. Enter your account credentials to log in. If you don't have an account, click on "Sign Up" to create a new account.
-
Click on the upload icon: Click on the upload icon located next to the profile picture in the top right corner of the screen. This initiates the process of uploading your XR experience to the VueXR platform.
-
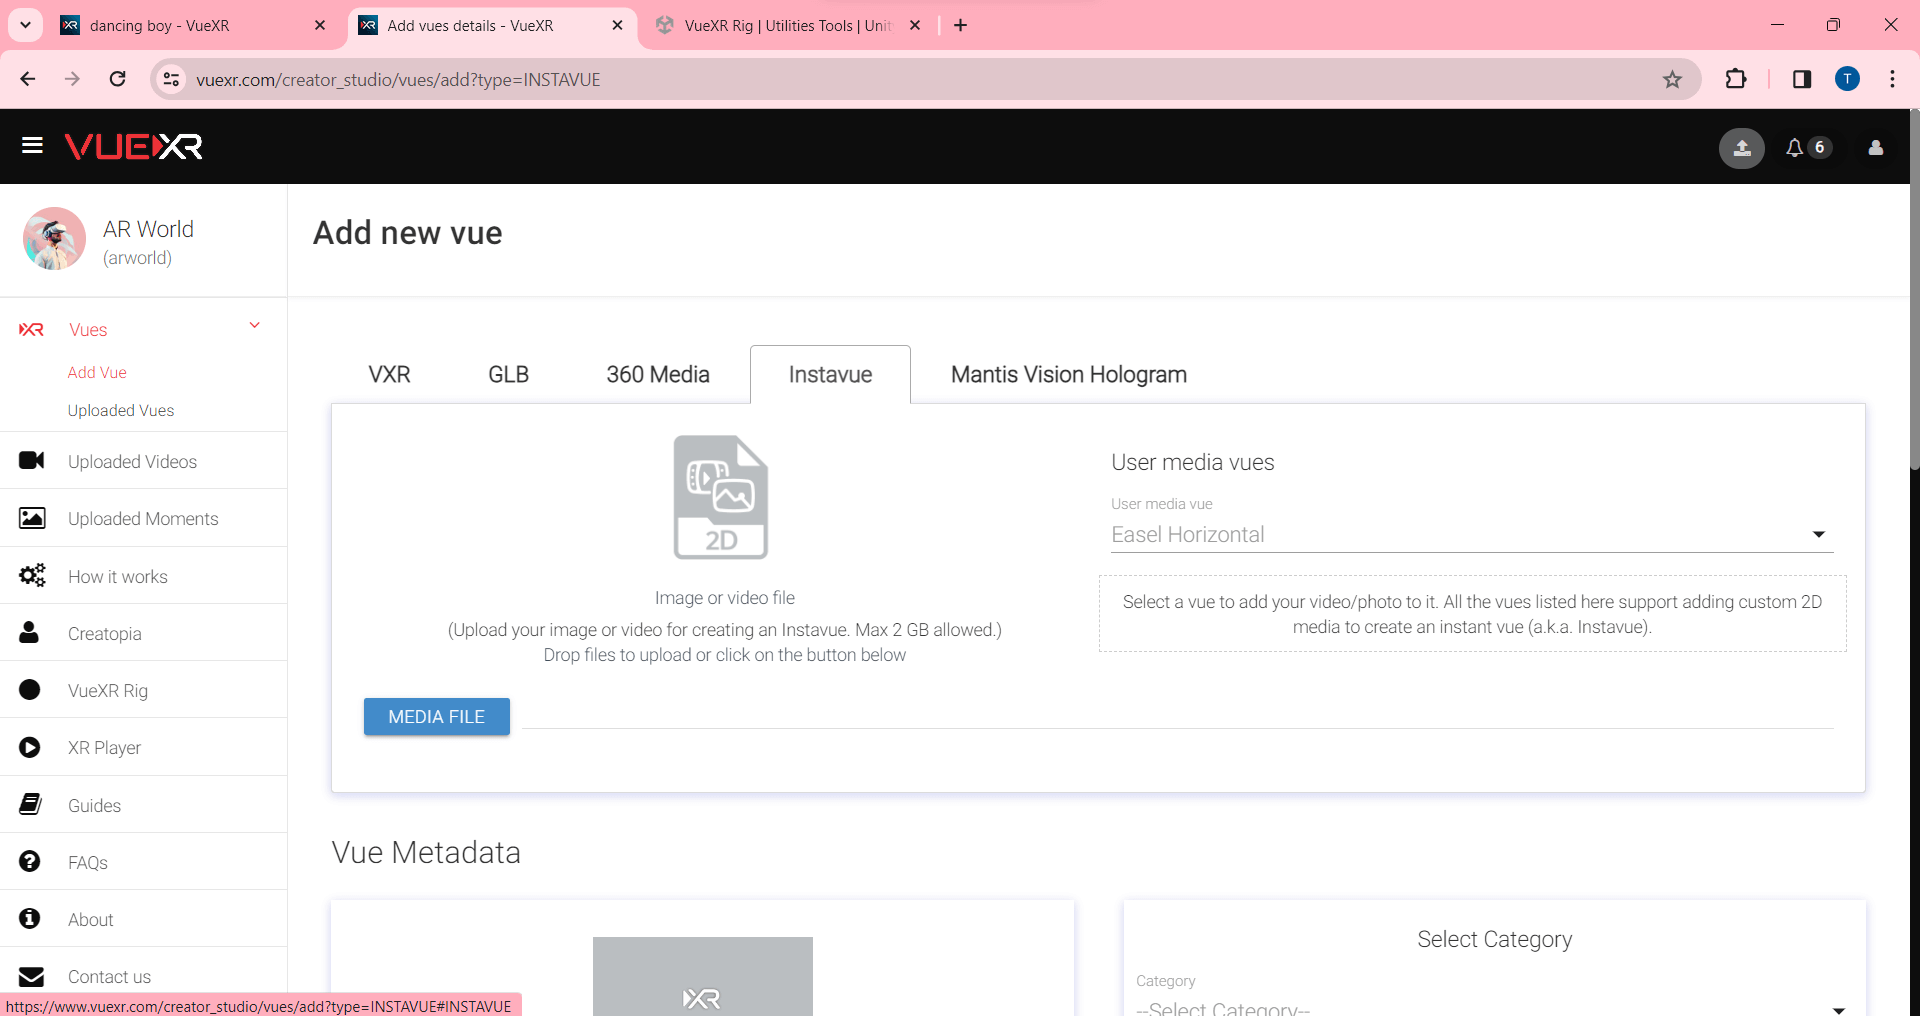
Instavue: Select the Instavue tab in the Vue upload form.
-
Upload image or video Files: In the upload form, you will find the option to upload the required image or video file.
-
Choose the file: On the upload page, click on the "Select File" button to browse your computer's files and select the media file you want to upload. Ensure that your file meets the requirements specified by VueXR (e.g., file size, supported formats).
-
Enter details and settings: After selecting the media file, you will be prompted to enter additional details and settings for your XR experience. This may include the user media vues, title, description, category, and other relevant information. Fill out the form with the required information.
-
Confirm and upload: Once you have filled out the necessary details, review all the information you have entered. Ensure that everything is accurate and to your satisfaction. When ready, click on the "Upload" button to start the upload process.
-
Wait for the upload to complete: The website will initiate the upload process for your media file. This may take some time, depending on the file size and your internet connection speed. Be patient and wait for the upload to complete. Do not navigate away from the page or close the browser during this process.
-
Preview and test: After the upload is complete, you will typically have the option to preview and test your media. Use the provided tools or functionality on the VueXR website to view and interact with your uploaded content. Ensure that everything looks and functions as intended.
-
Save and publish: If you are satisfied with the preview and testing results, save your Vue and proceed to publish it. Follow the on-screen instructions or prompts to finalize the publishing process.
-
Share and distribute: Once your XR experience is published, you can share it with others by providing the relevant links or sharing options provided by VueXR. Promote and distribute your XR experience to reach your intended audience.
By following these steps, you can successfully upload Instavue files and create XR experiences using the VueXR website. Remember to double-check all the details and settings before publishing to ensure the best possible experience for your audience.
A step-by-step guide to uploading Mantis Vision volumetric videos using the website.
Here is a step-by-step guide to uploading Mantis Vision Volumetric video files using the VueXR website:
-
Visit the VueXR Website: Open your preferred web browser and navigate to the VueXR website.
-
Sign In If you already have a VueXR account, click on the "Sign In" button in the top right corner of the website. Enter your account credentials to log in. If you don't have an account, click on "Sign Up" to create a new account.
-
Click on the upload icon: Click on the upload icon located next to the profile picture in the top right corner of the screen. This initiates the process of uploading your XR experience to the VueXR platform.
-
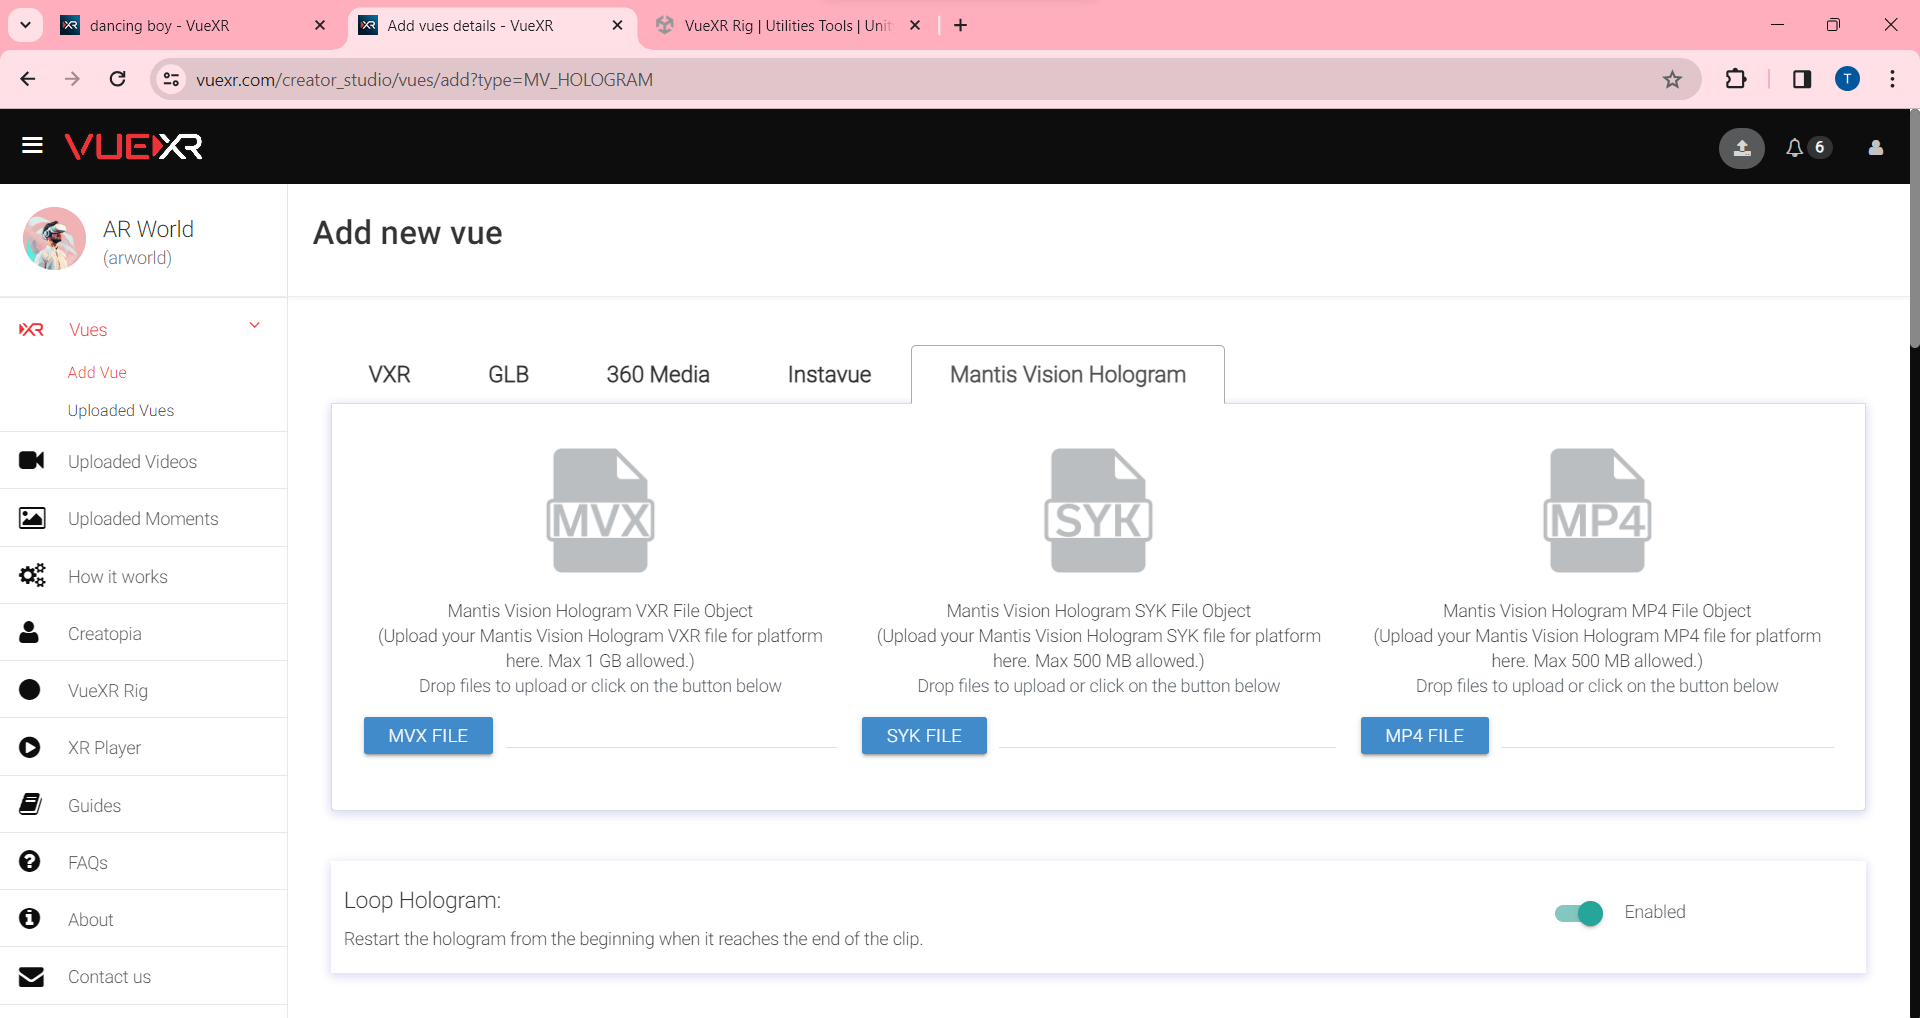
Mantis Vision Hologram tab: Select the Mantis Vision Hologram tab in the Vue upload form.
-
Upload Mantis Vision volumetric video Files: In the upload form, you will find the option to upload the required MVX, Mp4, and SYK files.
-
Choose the files: On the upload page, click on the "Select File" button to browse your computer's files and select the MVX file you want to upload. Repeat this same process for the Mp4 and SYK files. Ensure that your files meet the requirements specified by VueXR (e.g., file size, supported formats).
-
Enter details and settings: After selecting the required files, you will be prompted to enter additional details and settings for your XR experience. This may include the title, description, category, and other relevant information. Fill out the form with the required information.
-
Customize the XR experience: Depending on the platform and features supported by VueXR, you may have options to customize the XR experience. This can include selecting a background, adjusting lighting settings, enabling interactivity, or setting up other specific parameters. Customize these options according to your preferences.
-
Confirm and upload: Once you have filled out the necessary details and customized the XR experience settings, review all the information you have entered. Ensure that everything is accurate and to your satisfaction. When ready, click on the "Upload" button to start the upload process.
-
Wait for the upload to complete: The website will initiate the upload process for your files. This may take some time, depending on the file size and your internet connection speed. Be patient and wait for the upload to complete. Do not navigate away from the page or close the browser during this process.
-
Preview and test the XR experience: After the upload is complete, you will typically have the option to preview and test your XR experience. Use the provided tools or functionality on the VueXR website to view and interact with your uploaded content. Ensure that everything looks and functions as intended.
-
Save and publish: If you are satisfied with the preview and testing results, save your XR experience and proceed to publish it. Follow the on-screen instructions or prompts to finalize the publishing process.
-
Share and distribute: Once your XR experience is published, you can share it with others by providing the relevant links or sharing options provided by VueXR. Promote and distribute your XR experience to reach your intended audience.
By following these steps, you can successfully upload Mantis Vision volumetric video files and create XR experiences using the VueXR website. Remember to double-check all the details and settings before publishing to ensure the best possible experience for your audience.
A step-by-step guide to uploading MRCS volumetric videos using the website.
Here is a step-by-step guide to uploading MRCS Volumetric video files using the VueXR website:
-
Visit the VueXR Website: Open your preferred web browser and navigate to the VueXR website.
-
Sign In If you already have a VueXR account, click on the "Sign In" button in the top right corner of the website. Enter your account credentials to log in. If you don't have an account, click on "Sign Up" to create a new account.
-
Click on the upload icon: Click on the upload icon located next to the profile picture in the top right corner of the screen. This initiates the process of uploading your XR experience to the VueXR platform.
-
MRCS Hologram tab: Select the MRCS Hologram tab in the Vue upload form.
-
Upload MRCS volumetric video Files: In the upload form, you will find the option to upload the required MP4 file.
-
Choose the files: On the upload page, click on the "Select File" button to browse your computer's files and select the MP4 file you want to upload. Ensure that your file meets the requirements specified by VueXR (e.g., file size, supported formats).
-
Enter details and settings: After selecting the required files, you will be prompted to enter additional details and settings for your XR experience. This may include the title, description, category, and other relevant information. Fill out the form with the required information.
-
Customize the XR experience: Depending on the platform and features supported by VueXR, you may have options to customize the XR experience. This can include selecting a background, adjusting lighting settings, enabling interactivity, or setting up other specific parameters. Customize these options according to your preferences.
-
Confirm and upload: Once you have filled out the necessary details and customized the XR experience settings, review all the information you have entered. Ensure that everything is accurate and to your satisfaction. When ready, click on the "Upload" button to start the upload process.
-
Wait for the upload to complete: The website will initiate the upload process for your files. This may take some time, depending on the file size and your internet connection speed. Be patient and wait for the upload to complete. Do not navigate away from the page or close the browser during this process.
-
Preview and test the XR experience: After the upload is complete, you will typically have the option to preview and test your XR experience. Use the provided tools or functionality on the VueXR website to view and interact with your uploaded content. Ensure that everything looks and functions as intended.
-
Save and publish: If you are satisfied with the preview and testing results, save your XR experience and proceed to publish it. Follow the on-screen instructions or prompts to finalize the publishing process.
-
Share and distribute: Once your XR experience is published, you can share it with others by providing the relevant links or sharing options provided by VueXR. Promote and distribute your XR experience to reach your intended audience.
By following these steps, you can successfully upload MRCS volumetric video files and create XR experiences using the VueXR website. Remember to double-check all the details and settings before publishing to ensure the best possible experience for your audience.